- Promised: No Bundled Installers, No Toolbars, No Unfair Advertisements
- Greenshot 1.1.6 is ready for download
How to Upload Screenshots to a Web Server via FTP, SCP or SFTP
 Ever needed to upload screenshots directly to a server using the FTP, SCP or SFTP protocol? Actually it is quite easy to harness WinSCP's great scripting capabilities with Greenshot's flexible external command plugin. This blog post provides a simple WinSCP upload script and explains how to make Greenshot call the script to upload your screenshot.
Sidenote: we know, a specialized plugin for this would be a nice thing to have. A WinSCP plugin is definitely near the top of our todo list, but it probably will not be available before Greenshot 2.0. So in the meantime the following method is a good alternative.
If WinSCP is not installed on your system yet, you can download it from http://winscp.net/, it is free and open source, too.
If you have not heard of Greenshot's External Command Plugin yet or if you are not familiar with the Windows command line, you might want to have a look at How to use the External Command Plugin to send screenshots to other applications.
Configuring the upload script
It just needs a few lines to put together a WinSCP script that opens a connection, uploads a single file and closes the connection again - we have prepared a simple script for your convenience. Simply download the WinSCP upload script and store it on your hard disc. Of course, the script needs to know where to upload the files to, so you need to change your the connection settings (in the line starting with open) as well as the target directory on the server (starting with cd).
Testing the upload script
We recommend to test the script from the command line to see whether everything is alright. You can invoke the script by entering something like this into your command line:
"C:\path\to\WinSCP.com" /script="C:\path\to\winscpupload.txt" /parameter // """C:\path\to\testfile.jpg"""
Of course, C:\path\to\ should reference the path to the files on your local hard disc.
If everything works fine, the script should output something like
batch           abort

confirm         off

Searching for host...

Connecting to host...

Authenticating...

Using username "user".

Authenticating with pre-entered password.

Authenticated.

Starting the session...

Reading remote directory...

Session started.

Active session: [1] [email protected]

/remote/path/to/directory/

testfile.jpg |         80 KiB |   37,8 KiB/s | binary | 100%

Session '[email protected]' closed.

No session.
Configuring Greenshot to call the upload script
The rest is pretty easy:
- Select "Configure external commands" from Greenshot's main menu
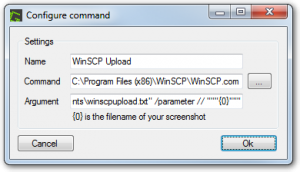
- Click the "New" button and enter the following values
- Name:
WinSCP Upload - Command:
C:\path\to\WinSCP.com - Argument:
/script="C:\path\to\winscpupload.txt" /parameter // """{0}"""
 Take care of the correct syntax, especially the quotes: if there is a space somewhere in a file system path, you need to wrap it into quotes. The last part of "Argument" is literally
 """{0}""", including the 6 double quotes and curly braces. (Greenshot will replace {0} with the filename of the screenshot.)
That's it. After confirming the new external command, you can use the WinSCP Upload option for future screenshots, from the destination picker or the editor's "File" menu.
